The DELAR Model
Background
The DELAR model is something I developed after years of doing IaC with various tools and finding myself reusing the same patterns. I wanted to explain how it works in a way that didn’t involve digging through code. Since everything was patterned in layers, I thought, what if I had a diagram similar to the OSI model for networking, but for IaC? I could use that as the starting point and it would give me a vocabulary to discuss it more easily.
I originally had some other names for it, one of them being Infrastructure as Data. A friend coined the term DELAR model after I presented it to his team at work. DELAR is an acronym for the layers of the model: Data, Execution, Library, API, and Resource.
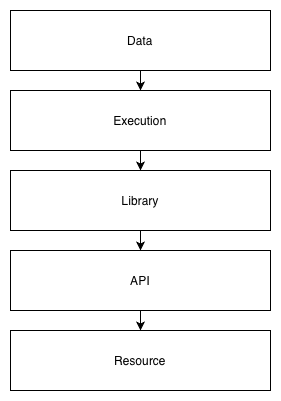
Why are the layers in that order? It’s the order that data flows through the stack. Data at the top represents the resources that are created at the bottom. The data passes through all the layers, in one direction, to achieve that.
I’ll use Terraform as the primary example throughout. At the end, I’ll show how it can apply to other tools, because the model is not tool-specific.
Data Layer
The data layer contains your configuration and is typically the directory in which you run your IaC tool. For Terraform, this is the root module.
It is usually a directory of files, sometimes in its own repo but isn’t required to be; you can also have a repo with multiple data directories. In an ideal world, a change to the files would instantly and atomically change the resources it manages, but alas the world isn’t ideal. So to get as close to it as possible, a CI/CD process will typically oversee this and trigger when it changes (what is called GitOps). This way the time between change and execution is as short as possible. The longer the data is out of sync with the resources, the greater the chance for confusion and errors.
The data layer is not intended to be reusable. If the data were reused, multiple “stacks” or environments would change simultaneously when triggered, which is usually not desirable. It is possible to create the data layer with separate per-environment variable files and share the other files. Many clients do this, and I have done it before, however I prefer a stricter no-reuse policy as it is more bulletproof, though you may end up with more duplication across your configs. Tools like terragrunt encourage making root modules reusable and I disagree with that approach entirely. My solution for reuse works with plain Terraform and what I call apex modules.
There are some exceptions to the rule of not parameterizing the data layer, but I don’t want to spend too much time on it here. One scenario would be if you have common variables such as API tokens that are needed during a deployment. You can define variables to receive them, and your CI/CD system can pass them as TF_VAR_* environment variables. However, in most cases you can achieve this in a better way, such as by storing the tokens in Vault or AWS Secrets Manager, and doing a lookup during the deployment.
What goes into the data layer:
- Variables: all of the configuration, including environment-specific data, AWS account information, etc.
- Dependencies and their versions: all library dependencies must be specified and are always pinned to the exact versions used. If you want it to still work in six months, never fail to follow this.
- Tool version: the exact version of the tool to be used, if supported by the tool. This is for the same reason as pinning the library dependencies. You don’t want a bug or deprecation of a feature to cause it mysteriously stop working.
What doesn’t go here:
- Bare resources
- Arbitrary scripts
Regarding pinned versions in Terraform, the file .terraform.lock.hcl will be created when you run terraform init, which will automatically pin the versions and hashes of providers that it downloads. The issue is that the hashes may differ depending on the OS and architecture you run it on. So I generally avoid using their lock files and just pin the versions within a required_providers block (see the example below).
Execution Layer
The execution layer is the thinnest of all the layers. In its simplest form, it is just you running terraform apply. In its more complex forms, it may be a CI/CD pipeline that also runs, well, terraform apply. But in the CI/CD pipeline, it will typically have more stages to it. For example, you push code to the git repo and open a PR. The first stage of the pipeline triggers and runs terraform plan and opa eval. If it succeeds, you are allowed to merge the PR. Then the second stage runs terraform apply.
Even at its most complex, the execution layer should never be very complex though. It should work the same way no matter what code you push. And it shouldn’t do anything you can’t do yourself to test and verify it works.
You can think of the execution layer as the main function of your IaC “program”. A well-formed main function usually doesn’t do a lot. It takes inputs in the form of arguments or files, validates them, does some initialization, and passes the inputs on to library code which is parameterized to handle generic inputs.
It is good to have a template for your CI/CD pipeline that works the same across any directory that contains your data layer, so your execution is totally uniform. Think of your execution layer like a tool such as git: git works on any repo. You don’t have a special version of git for different repos, instead you structure the repo to work with git. Similarly, once your execution layer is defined, you structure all of your data layer the same way to work with it. This means you standardize how you call your tool. Different data directories don’t take different arguments, the data is the argument.
When developing IaC, you need a sandbox environment in which to work. In the sandbox, you want to be the execution layer, not CI/CD. This way you can test that everything is working before it gets pushed to the repo. It is much faster to modify some code and run the tool immediately than to modify the code, commit it, push it to a repo, open a PR, get an approval, wait for CI/CD to trigger, and pray that it works (the push and pray model). Once you’ve done it yourself and know that it works locally, you can push to the repo. And given that your CI/CD pipeline runs the same commands you have been, it stands a much higher chance of working there on the first try.
The execution layer should rarely change. If you modify it, it should be because you need to make a change common to all of your infrastructure pipelines. For example, your CI/CD might pass some common variables to all stacks, and you need to add another. In that case, go ahead and make the change. Don’t change the execution layer to add workarounds for snowflake environments that work a little differently from everything else. That is when things start to break down. I have never seen a case where such workarounds could not be done better in one of the other layers, usually the library layer.
It can be useful to create a wrapper for your tool to use as the “authoritative” execution layer. It can take the 2-3 commands you normally run and turn it into 1. And it can ensure you have the right version of the tool. Say you’ve pinned the Terraform version in your root module, as you should, but different root modules may pin other versions. Your wrapper can parse the required_version and download it on the fly, then run your usual commands with it. Distribute the wrapper to your team and have everyone use it, as well as your CI/CD pipelines.
Library Layer
The library layer is the core of the IaC stack. Resources should be defined here, not in the data layer. Libraries, or modules, should be parameterized so they are reusable by multiple instances within the data layer.
In Terraform, the library layer is made up of modules, specifically child modules. It is unfortunate that Terraform root modules are not a separate construct from modules altogether. This lack of distinction between root and child modules creates a lot of friction in the world of Terraform. Multiple products are even based on overcoming this flaw. Root and child modules should be treated as separate constructs, but it falls on you to enforce that discipline, since the tool does not.
Libraries must take parameters for anything that could change between environments. Treat them like you are developing third party software. The data layer will take care of passing in your company or environment-specific parameters.
For anything nontrivial, there will be multiple layers within the library layer itself. Libraries will need to use other libraries. But do not create a deeply nested hierarchy. As the Zen of Python says, flat is better than nested. Put your libraries or modules in a flat namespace, and pull them in as dependencies, rather than nesting them within each other. It is okay to have a module that contains a collection of related submodules, but keep it shallow, no more than one level deep. Deeply nested hierarchies result in messes that cannot be untangled, and they make reuse difficult.
API Layer
The API layer is the code that calls external APIs to create resources. In Terraform, this is the provider. Most of the time you probably don’t touch this, but there are times when you might develop your own provider. That is outside the scope of this document, so I will leave it at that.
Resource Layer
The resource layer is the end goal: actual resources you create, cloud or otherwise. Earlier versions of the model split this into two halves, one for the APIs that are called and the other for the actual resources created. Later I merged them since, for IaC purposes, resources are generally represented by their APIs, and once you are working in this layer you aren’t really doing IaC any more.
Apex Modules
Apex modules are Terraform child modules that wrap multiple dependent modules into a single “top level” module. You can then call only one module from your data layer, or root module. It is essentially a reusable pseudo-root module.
Why do we need them? Because root modules should not be reused, but we also want to follow the DRY principle as much as possible. Root modules that grow too large and call many other modules are at risk of becoming “more than data”, and there can also be a lot of duplication. How do you know if your root module is “more than data”? An easy heuristic: if it uses for_each, it is.
An example of an apex module might be a Kubernetes cluster management module. It might depend on a control plane module, multiple calls to a node group module, and maybe some additional configuration modules. Since your root module would grow quite large if you called all of them and were doing for_each over the node groups, you decide to create one single apex module that defines parameters and calls all the dependent modules. Now your root modules are simplified because they only need to call one module and pass parameters to it.
Note that as discussed in the library layer, the apex module doesn’t embed a bunch of other modules, it depends on them and calls them. And again, this is not really Terraform-specific. You can create apex Ansible roles, for example.
Example
The repository https://github.com/cloudboss/terraform-aws-tailscale-subnet-router has an example root module structured according to the DELAR model.
It contains three files: main.tf, state.tf, and vars.tf. Notice how vars.tf just defines locals that are passed to the module in main.tf. There is no need for a variables.tf and *.tfvars because this is not meant to be reused. Another environment would use the same main.tf and modify only state.tf and vars.tf.
The execution layer for this is to run the following commands with your AWS credentials in scope:
terraform init
terraform plan -out plan.out
terraform apply plan.out
I can incorporate those same commands into my CI/CD pipeline template and get correct results for any data layer I run it on.
main.tf:
terraform {
  required_version = "=1.13.3"
  required_providers {
    archive = {
      source  = "hashicorp/archive"
      version = "=2.5.0"
    }
    aws = {
      source  = "hashicorp/aws"
      version = "=5.61.0"
    }
  }
}

provider "aws" {
  region = local.aws_region
}

module "tailscale" {
  source  = "cloudboss/tailscale-subnet-router/aws"
  version = "0.2.0"

  ami                = local.ami
  autoscaling        = local.autoscaling
  enable_nat_gateway = local.enable_nat_gateway
  kms_key_id         = local.kms_key_id
  ssh_key            = local.ssh_key
  stack_key          = local.stack_key
  subnet_ids         = local.subnet_ids
  tailscale          = local.tailscale
  vpc_id             = local.vpc_id
}
state.tf:
terraform {
  backend "s3" {
    bucket       = "terraform-o2ym9tux"
    key          = "terraform/tail/terraform.tfstate"
    region       = "us-east-1"
    use_lockfile = true
  }
}
vars.tf:
locals {
  ami = {
    name = "tailscale-v1.88.3"
  }
  autoscaling = {
    instance_type = "t3a.nano"
  }
  aws_region = "us-east-1"
  enable_nat_gateway = true
  kms_key_id = "alias/credentials"
  ssh_key = "easyto"
  stack_key = "tail"
  subnet_ids = [
    "subnet-ce19ab6789a0f558b",
    "subnet-770acebbb9c051efa",
    "subnet-a9d33d85eef79e604",
  ]
  tailscale = {
    authkey_ssm_path = "/tail/authkey"
  }
  vpc_id = "vpc-cfaf8fae40a4beef1"
}
Ansible DELAR Model
The first tool I used where I followed this pattern very closely was Ansible.
The example directory in my keights repository is a data layer for a Kubernetes cluster that was built by Ansible. The deploy script is the execution layer wrapper.
The Ansible version of the pattern works as follows.
Data
The Ansible data layer is a directory containing:
ansible.cfg: Ansible configuration options.playbook.yml: The playbook to run. The playbook contains only calls to roles (library layer), not modules directly, much like the Terraform root module only calls other modules, not resources directly. This may sound a little confusing since both Ansible and Terraform use the term modules, but they are different. Terraform modules are like Ansible roles, and Terraform resources are like Ansible modules.requirements.txt: The pinned versions of all Python dependencies, including Ansible itself and all transitive dependencies. Python libraries used by modules go in here too.requirements.yml: A requirements.yml to define library dependencies, or roles, thatansible-galaxydownloads and places intoroles_path(defined inansible.cfg, usually.cache).vars.yml: The variables passed toansible-playbook.
Execution
The execution is done by ansible-playbook, but I use a wrapper script for it. The wrapper first creates a .cache directory and creates a Python virtualenv in it. Then it runs .cache/virtualenv/bin/pip install -r requirements.txt. Because Ansible and all its dependencies are defined in requirements.txt, now ansible-playbook and ansible-galaxy will be installed in the virtualenv. If the requirements.yml exists, the wrapper runs ansible-galaxy to install the roles under .cache. Then it runs .cache/virtualenv/bin/ansible-playbook playbook.yml, passing the vars.yml. Everything is bootstrapped by the wrapper. The only thing you need to start with is Python. My wrapper did not download a specific version of Python on the fly, but it could have been added to make it more complete. Additional external dependencies can be added within an Ansible role, and have them retrieved during the run.
Library
The library layer is made up of Ansible roles. Each role is parameterized, the same as with Terraform library modules. The parameters are normally passed as a dictionary with one top level key named after the role.
Example:
  roles:
  - role: keights-stack
    keights_stack:    # Top level dictionary key
      state: '{{ state }}'
      cluster_name: '{{ cluster }}'
      vpc_id: '{{ vpc_id }}'
      ...
The purpose of the top level key is to provide a namespace for the role’s variables so they can’t conflict with globals, which is easy to do in Ansible. Within the role it looks for its variables within that dictionary.
Most of the time I’ve published roles as plain tarballs in e.g. Artifactory or similar, and the archive file and URL have the version in it so the version is inherently pinned. It’s not fancy at all, but it is supported by requirements.yml and works just about perfectly.
API
The API layer is where Ansible modules live. If needed, you can write a custom module and package it within a role, so the ansible-galaxy dependency mechanism works, and you can pin its version in requirements.yml and define the library path to point to it within ansible.cfg. Although the Python and ansible-galaxy packaging story has its warts, everything pretty much Just Worked when I have done this.
Resource
This is exactly the same as any other resource layer, so there is nothing to add.
Conclusion
For me this method works time and again, on day one and day two, and even months later. I see very low levels of failed deployments compared to other IaC structures that I’ve come in contact with.
This model can be expanded to just about any other configuration tool, like CDK, Helm, or even your own custom tools.